> For the complete documentation index, see [llms.txt](https://docs.personaldiscount.io/llms.txt). Markdown versions of documentation pages are available by appending `.md` to page URLs; this page is available as [Markdown](https://docs.personaldiscount.io/discounteo-for-shopify/integrate-discounteo-with-your-email-service-provider/mailchimp/how-to-create-a-birthday-campaign-with-a-discount-code-using-mailchimp.md).

# How to create a birthday campaign with a discount code using Mailchimp

Discounteo does not support a dedicated trigger to generate discount codes on a birthday with Mailchimp. Nevertheless, there is a clever workaround. With this approach, the discount code displays as a clickable image that will redirect a customer to your store with a discount applied.

Start by creating a new automation in Discounteo. Click on **Add automation**. Select **Other** as your Email Service Provider and **Happy Birthday** as the campaign type.&#x20;

<figure><img src="https://3731721370-files.gitbook.io/~/files/v0/b/gitbook-x-prod.appspot.com/o/spaces%2F-LZdVZovthV0SPlgxS6Y%2Fuploads%2Fo3BVt0rLgp0LZLxjv83o%2Fpersonal-discount-shopify-create-birthday-campaing-mailchimp-animated.gif?alt=media&amp;token=f746f1be-4ea8-4e8e-979e-51cf2a23f019" alt="How to create a Happy Birthday automation in Discounteo"><figcaption><p>Create a Happy Birthday automation in Discounteo</p></figcaption></figure>

Set the parameters of discount codes that will be created by this automation. Find more in the article on [how to configure discount](/discounteo-for-shopify/configure-discount.md) to make the most of the options provided by the app.

Once you have completed this stage, **save** your automation and **copy** the code snippet.&#x20;

<figure><img src="https://3731721370-files.gitbook.io/~/files/v0/b/gitbook-x-prod.appspot.com/o/spaces%2F-LZdVZovthV0SPlgxS6Y%2Fuploads%2FdGknP81Ijg3LZJNh4yaF%2Fpersonal-discount-copy-code-snippet-birthday-campaign.gif?alt=media&amp;token=703eab75-1042-4ac0-8ff5-e2eb82a864e9" alt="Discounteo: Copy the code snippet"><figcaption><p>Discounteo: copy the code snippet</p></figcaption></figure>

The next step is creating a birthday campaign in Mailchimp. You can do this using **Journey** or **Classic Automations**. Navigate to the **Mailchimp dashboard**  > **Automations** > **Build from scratch**. Type your Journey name and hit **Start Building**.

<figure><img src="https://3731721370-files.gitbook.io/~/files/v0/b/gitbook-x-prod.appspot.com/o/spaces%2F-LZdVZovthV0SPlgxS6Y%2Fuploads%2FSGD7l659UgDqScu1tBOT%2Fmailchimp-create-new-journey-from-scratch.gif?alt=media&amp;token=c5ad4e4c-5878-48f4-8f44-420e09b24139" alt="How to create a new Mailchimp Journey from scratch"><figcaption><p>Create a new Mailchimp Customer Journey from scratch</p></figcaption></figure>

Set **Birthday** as the starting point of your automation. Decide how many days before the subscriber's Birthday date you want to send a message to them and indicate the name of the field where this date is stored in Mailchimp.

<figure><img src="https://3731721370-files.gitbook.io/~/files/v0/b/gitbook-x-prod.appspot.com/o/spaces%2F-LZdVZovthV0SPlgxS6Y%2Fuploads%2FzkWNj0Ykn0M7zGlpgcZu%2Fmailchimp-create-birthday-journey-starting-point-animated.gif?alt=media&amp;token=f5f83afe-11bb-4b43-a452-644acc56a3aa" alt="Mailchimp: How to set the starting point for a birthday automation"><figcaption><p>Mailchimp: Set the starting point for a birthday automation</p></figcaption></figure>

**Add a Journey point**. We want to **send email**. Next, design your message. You can choose from the themes or build an email from scratch.&#x20;

<figure><img src="https://3731721370-files.gitbook.io/~/files/v0/b/gitbook-x-prod.appspot.com/o/spaces%2F-LZdVZovthV0SPlgxS6Y%2Fuploads%2Fo0Pkn0fZ9HGPn7GwY39W%2Fmailchimp-create-birthday-journey-send-email-point-animated.gif?alt=media&amp;token=2b571734-ba10-4228-90bb-ceea4b1c2b29" alt="Mailchimp: Add a Journey step to send an email"><figcaption><p>Mailchimp: Add a Journey step to send an email</p></figcaption></figure>

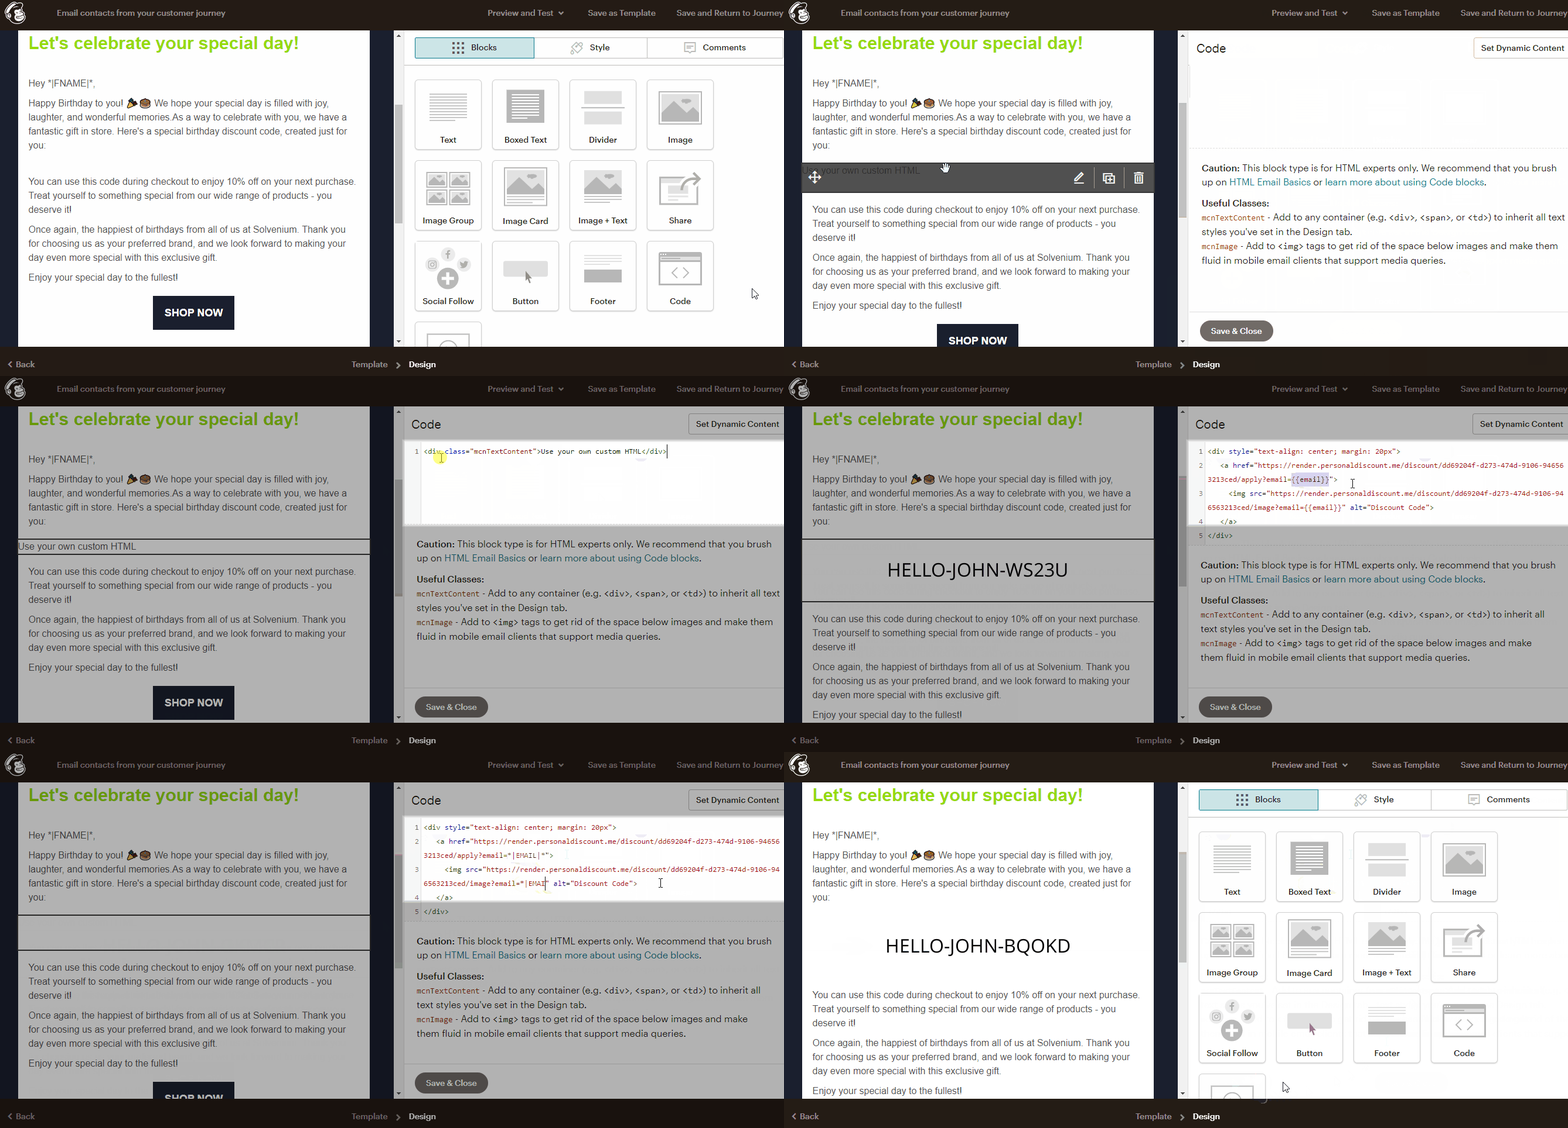
Customize your email template. Next, drag and drop a code element into the place where you want a discount code to be displayed. Delete the placeholder div and paste the code snippet from Discounteo. Then replace both occurrences of **{{ email }}** with **\*|EMAIL|\*** in the code snippet. **Save & close** the code element. You will see an example discount code in your email template.&#x20;

<figure><img src="https://3731721370-files.gitbook.io/~/files/v0/b/gitbook-x-prod.appspot.com/o/spaces%2F-LZdVZovthV0SPlgxS6Y%2Fuploads%2Fb5ui6fNeq5acPiZMqCuF%2Fmailchimp-create-birthday-email-insert-discount-code.gif?alt=media&amp;token=e5e223d8-28d6-42db-a7a7-e46b51e1e7e4" alt="How to insert a discount code into a Mailchimp birthday campaign email"><figcaption><p>Insert a Discounteo discount code into a Mailchimp birthday campaign email</p></figcaption></figure>

When your email template is ready, hit **Save and Return to Journey**. Then click on **Continue** and **Turn On** to activate the automation. Your automation will appear on the list in **Overview** of the **Automations** section.&#x20;

<figure><img src="https://3731721370-files.gitbook.io/~/files/v0/b/gitbook-x-prod.appspot.com/o/spaces%2F-LZdVZovthV0SPlgxS6Y%2Fuploads%2F8HN4dcq82vWMNIwbBijB%2Fmailchimp-activate%20birthday-campaign.gif?alt=media&amp;token=b59439ba-6b97-4bd8-8964-4414e5259240" alt="How to activate a Birthday Journey in Mailchimp"><figcaption><p>Activate the Birthday Journey in Mailchimp</p></figcaption></figure>

From now on, your subscribers will receive a message with a discount code the day before their birthday.

<figure><img src="https://3731721370-files.gitbook.io/~/files/v0/b/gitbook-x-prod.appspot.com/o/spaces%2F-LZdVZovthV0SPlgxS6Y%2Fuploads%2FNMG3of6b39f9RTypMp9F%2Fmailchimp-and-personal-discount-birthday-campaign.png?alt=media&amp;token=ad0f1cbc-cc64-4e78-b310-2c587fd481f6" alt="Discounteo discount code in a Mailchimp Birthday campaign"><figcaption><p>Discounteo discount code in a Mailchimp birthday campaign</p></figcaption></figure>